



Laptop Display Cable Damage – Symptoms and Repair Guide Now
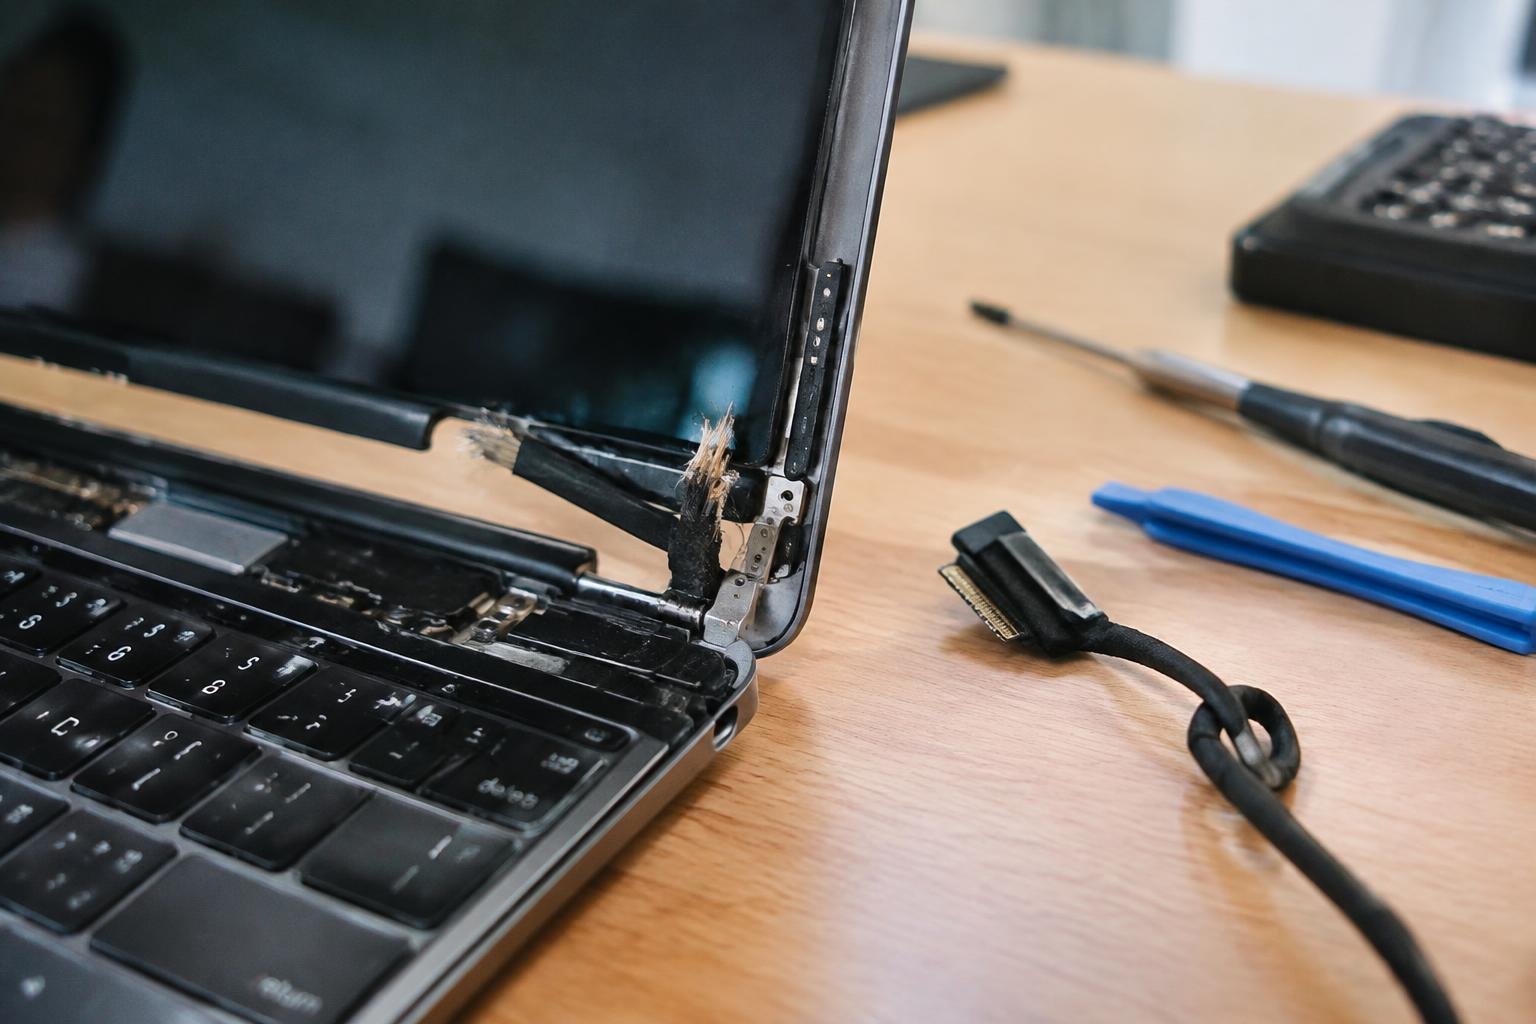
A laptop screen that flickers, goes dark when you adjust the lid, or shows colored lines may have a damaged display cable rather than a failed panel. The cable runs through the hinge area, where repeated opening and closing can strain its conductors or loosen a connector. Recognizing that pattern helps you distinguish cable trouble from backlight or screen damage.
Key Takeaways:
- A damaged display cable often causes flickering, colored lines, a blank screen, or image changes when the laptop lid moves; similar symptoms can also come from a failing LCD panel or graphics hardware.
- Technicians narrow down the fault by testing with an external monitor, inspecting the hinge area, and checking the display connector and cable for pinching, fraying, or loose seating.
- Replacing a damaged cable requires disconnecting the battery, removing the display bezel or bottom cover as needed, and routing the replacement through the hinge without trapping it.
- The correct replacement cable must match the laptop’s exact model and display configuration, since connectors and wiring can differ between versions of the same laptop.
- Repeatedly opening the lid forcefully or carrying the laptop by its screen can strain the cable near the hinges, where damage commonly develops.
Common Symptoms of Laptop Display Cable Damage
A damaged display cable can interrupt the video signal between your laptop’s motherboard and LCD panel, producing symptoms that change as the lid moves or the cable flexes near its hinge. The fault often affects the built-in screen while an external monitor continues to show a stable image, since it uses a separate connection. Symptom patterns vary with the location and severity of cable wear, from brief visual glitches to a completely dark panel.
Flickering, dimming, and intermittent display
Flickering, brief dimming, or a screen that cuts in and out often points to an unstable connection in the display cable, especially where it passes through the hinge. You may notice the image return as the lid shifts, then disappear again at a particular angle. A loose connector can also interrupt power to the panel’s backlight, leaving faint image content visible under a bright light while the screen appears dark during normal use.
Lines, color distortions, and blank screens
Vertical lines, washed-out colors, or patches of incorrect color can appear when damaged cable conductors disrupt image data reaching the LCD panel. A partial fault may affect only part of the screen, while a more severe break can leave the built-in display blank even though the laptop remains on. These symptoms can resemble panel damage, but cable-related distortions often shift or change as the lid angle changes.
- A loose bezel can press against the display cable.
- Repeated lid movement can wear insulation near the hinge.
- Liquid residue can corrode a cable connector.
Diagnosis and Types of Display Cable Damage
Accurate diagnosis starts with observing how the image changes as the lid moves and identifying the cable route and connector style used in your laptop. Most models carry a thin display harness through one hinge, with an eDP connector on newer screens or an LVDS connector on some older systems. A service manual or model-specific parts diagram can confirm the cable path before you inspect it, while symptom patterns help separate physical damage from faults elsewhere in the display system.
Inspecting the hinge area and cable connections
With the laptop powered off and unplugged, examine the hinge gap for a cable that is exposed, trapped, or pulled taut as the lid opens. The harness usually passes from the motherboard beneath the hinge cover and into the display assembly. If you are trained to open the case, inspect the motherboard connector and panel-side connection for a displaced plug or unsecured latch; avoid pulling on the wires. A change in the image as the lid angle shifts often points toward this moving cable path.
Recognizing wear, pinching, and connector damage
Look for flattened insulation, sharp creases, frayed shielding, or abrasion where the harness bends around the hinge. Repeated lid movement can wear conductors inside an outer sleeve that still appears intact, while a pinched cable may leave a visible pressure mark near the hinge bracket. Connector faults show different signs, including bent contacts, a cracked locking tab, corrosion, or a plug sitting unevenly in its socket. eDP and LVDS harnesses differ in connector design and pin layout, so they are not interchangeable.
Distinguishing cable faults from screen or graphics issues
Observe whether the fault changes with lid position, appears only on the built-in display, or affects an external monitor as well. A flicker, colored lines, or brief image loss triggered by hinge movement supports a cable or connector fault. A cracked panel usually shows localized impact damage or persistent lines, while faults visible on both displays point more strongly toward graphics hardware or software. A flashlight test can reveal a faint image during backlight failure, which is distinct from a broken video signal.
| Observed sign | Likely area | Useful distinction |
|---|---|---|
| Image changes with lid angle | Hinge cable or connector | Movement affects the fault |
| Localized crack or persistent lines | Display panel | Damage remains in one screen area |
| Built-in and external displays both fail | Graphics hardware or software | Fault is not limited to the laptop panel |
| Faint image visible under flashlight | Backlight system | Image signal remains present |
Factors That Affect Repair Decisions
Your repair estimate depends on more than the cable itself. Labor varies with how much of the laptop must be dismantled, while parts cost and availability depend on the specific model. A technician also needs to account for warranty coverage and the risk of damaging nearby components. These factors shape whether a repair is straightforward or requires specialized handling, particularly in thin laptops where the display assembly and hinges leave little room to work.
Laptop model, cable design, and parts availability
Model design determines how accessible the display cable is and whether it can be replaced separately from the screen assembly. A service manual, model number, and compatible part listing help establish what the repair requires. Some laptops use a dedicated cable routed through the hinge; others integrate the connection into a display assembly or use model-specific connectors. If an original replacement cable is discontinued, sourcing a verified compatible part can extend turnaround time and change the estimate.
Warranty, tools, and technical skill
Warranty status affects who should perform the repair: opening a laptop can affect coverage, depending on the manufacturer’s terms and the nature of the damage. A technician typically needs precision screwdrivers, plastic opening tools, and an ESD-safe workspace; certain models also require manufacturer-specific disassembly tools. Your own experience matters because fragile display connectors and hinge routing are easy to damage. A repair shop’s labor quote often reflects that risk and the time needed to protect the panel.
- Confirm the exact model and screen configuration.
- Ask whether the quoted part is original or compatible.
- Request the warranty terms for the replacement cable.
Step-by-Step Cable Repair or Replacement
Follow the laptop manufacturer’s service procedure for the specific model, since display connectors, cable routes, and hinge assemblies vary. Keep track of screw locations as you work, and use a plastic opening tool near the bezel and chassis to limit damage. A service manual or model-specific teardown guide identifies the correct access points before you remove covers. Keep the battery disconnected during cable handling, and avoid pulling on thin wires or flex sections.
| Stage | Action | Key detail |
|---|---|---|
| Prepare | Shut down and isolate power | Disconnect the battery before touching connectors |
| Access | Remove covers and bezels as specified | Use a plastic opening tool |
| Inspect | Release and examine the cable | Check connector locks and the hinge route |
| Fit and test | Seat the replacement and verify operation | Reconnect power only after reassembly |
Powering down and preparing the laptop
Shut the laptop down completely, unplug the charger, and remove any dock or connected peripherals. Place it on a clean, static-safe work surface, then follow the service manual to remove the base cover and disconnect the internal battery before handling display components. Use a correctly sized Phillips or Torx driver to avoid stripping screws, and arrange removed fasteners by location. If the battery is swollen or damaged, stop and have a qualified technician handle the device.
Accessing, disconnecting, and inspecting the cable
Remove the bezel or hinge cover only as directed for your model, using a plastic spudger rather than a metal blade near the display panel. Locate the display cable connector, release its latch or adhesive retainer, and pull the connector straight out by its reinforced tab, never by the wires. Trace the cable through the hinge channel and inspect for pinching, torn insulation, bent contacts, or a loose connector at the motherboard end.
Replacing the cable and testing the display
Route a replacement cable along the original channel, keeping it clear of hinge joints, screw posts, and sharp chassis edges. Seat each connector evenly, secure its latch or retaining tape, and confirm the cable has enough slack for the lid to open without tension. Reinstall the covers before reconnecting the battery and charger. Start the laptop and check the image at different lid angles, then verify that the backlight and display remain stable.
Repair Options: Pros and Cons
Your choice depends on your repair experience, the laptop’s construction, and the consequences of a mistake. A removable bottom panel and accessible display connector make the work more manageable, while glued components or a fragile screen assembly raise the risk. Compare the cost of a replacement cable and suitable tools with a technician’s service quote, including any diagnostic fee. Warranty coverage also matters, since opening the case yourself can affect manufacturer or retailer service.
| Option | Advantages | Trade-offs |
|---|---|---|
| DIY repair | Lower labor expense and direct control over parts | Risk of connector, cable, or screen damage |
| Professional service | Experienced diagnosis and installation | Labor charges and possible diagnostic fees |
| Manufacturer or authorized service | Access to model-specific parts and warranty guidance | Service availability and pricing vary by model |
DIY repair: cost savings and risks
For a laptop with a straightforward service manual and a readily available replacement cable, you can reduce labor costs by doing the repair yourself. Use a precision screwdriver set, plastic opening picks, and an antistatic wrist strap, then disconnect the battery before touching the display connector. Cable routing through the hinge requires care: a pinched or sharply bent replacement can fail quickly. If the screen assembly is bonded or the connector latch is damaged, a DIY attempt can turn a cable repair into a more expensive screen replacement.
Professional repair: expertise and service costs
Choose a qualified repair technician when the laptop requires screen disassembly, the cable runs through a tight hinge channel, or you cannot identify the correct part number. A technician can inspect the connector and cable path, then test the display after reassembly. Service costs typically include labor and the replacement part, with additional charges possible for diagnostics or related damage. Ask whether the quote covers the cable, installation, and post-repair testing, and whether the shop provides a written warranty on its work.
Maintenance and Prevention Tips
Build gentle handling and routine cleaning into your daily laptop use to limit stress on the display assembly. Keep the computer on a stable surface while you work, and avoid lifting or carrying it by the screen. Store it in a padded compartment where pressure from chargers, books, or other equipment cannot push against the lid. Small habits around setup, transport, and workspace care reduce avoidable strain on the display cable.
Opening and closing the lid carefully
Open your laptop from the center of the lid, where force is distributed more evenly across the hinge assembly, rather than pulling up from one corner. Move the screen smoothly and avoid stopping it abruptly at its open position. Before closing the lid, remove objects such as pens or earbuds from the keyboard, since pressure against the panel can load the hinges and cable route. Carry the laptop with the lid fully closed and secured.
Keeping hinges and cable pathways clear
Keep crumbs, dust, and loose fibers away from hinge gaps, where debris can interfere with movement or collect near the display cable’s passage. Clean the exterior hinge area with a soft, dry brush, and do not insert tools or liquid into the seam. Place the laptop on a flat surface so its base does not twist while you adjust the screen. For transport, use a fitted sleeve that prevents items from pressing against the hinge corners.
- Keep magnetic phone mounts away from the display bezel.
- Route charging cables behind the laptop, not across the hinge.
- Do not stack books or accessories on a closed lid.
- Use both hands when relocating an open laptop.
To wrap up
Recognizing display cable damage early can keep a loose eDP connection or frayed hinge cable from turning into a more extensive screen repair. You can use flickering, image loss when the lid moves, or visible cable wear as clues, but confirm the fault before replacing parts because a damaged panel or connector can produce similar symptoms. A technician can inspect the routing, reseat the connector, and replace a worn cable with a compatible part while protecting the display hinges and motherboard socket.
FAQ
How much does it cost to fix laptop display cable damage?
The cost depends on the laptop model, cable availability, and whether you pay for professional labor. A straightforward repair may cost less than replacing a screen assembly, but some models require extensive disassembly or a more costly integrated part, so request a quote based on the exact model.
How long does it take to replace a laptop display cable?
A repair can take from under an hour to several hours, depending on how difficult the laptop is to open and route the cable through its hinges. Shop turnaround may be longer if the correct cable needs to be ordered or the technician finds additional damage.
Can I keep using my laptop with a damaged display cable?
You may be able to use it temporarily with an external monitor, but continued use can make the internal display unreliable. Stop using it if the cable or hinge area is hot, visibly damaged, or producing a burning smell, and have the laptop inspected.
What mistakes should I avoid when replacing a laptop screen cable?
Avoid forcing the laptop open, pulling on the cable, or disconnecting it while the battery is connected. Cable routing and connector locks vary by model, so using the wrong part or pinching the cable during reassembly can cause further damage; follow the model-specific service instructions.
Is laptop display cable damage worth repairing?
Repair is often worthwhile if the laptop otherwise works well and the replacement cable is available at a reasonable cost. Compare the repair quote with the value and condition of the laptop, especially if the screen, hinges, or motherboard may also need repair.
Can an external monitor fix a laptop screen problem without replacing the cable?
An external monitor can provide a temporary workaround if the laptop’s graphics system and video output are working. It does not repair the internal display cable, and a persistent internal screen fault may still require diagnosis to distinguish cable damage from a screen or graphics problem.
Can laptop display cable damage be prevented?
Careful lid use and keeping the hinge area free of pressure can reduce strain on the display cable. Avoid carrying the laptop by its screen or forcing a stiff hinge, but normal use cannot prevent every failure because cables and connectors can wear over time.
 Previous Post
 Next Post